Specific — name the exact hazard and location, not a general theme.
Free · Self-paced
Hazard Recognition & Risk Assessment Fundamentals
Five short lessons and a graded assessment. Anyone may study as a guest, while saved progress and certificates require a verified learner account.
0% complete
Training scope
This course teaches a general hazard-recognition method. It does not replace applicable legislation, regulator requirements, your employer's risk procedure, equipment instructions or competent task-specific training. Risk criteria and stop-work rules must come from the applicable jurisdiction and your organization's approved system.
What counts as a hazard?
A hazard is anything with the potential to cause harm — an object, a condition, an activity, or an environment. A risk is the likelihood that hazard actually causes harm, combined with how severe that harm would be. Keeping these two words distinct matters: you control hazards directly, but you manage risk by changing likelihood, severity, or both.
The five common hazard categories
1 / 5
Physical
Noise, heights, machinery, electricity, temperature extremes.
Chemical
Solvents, dust, fumes, anything with a safety data sheet.
Biological
Mould, bacteria, bloodborne pathogens.
Ergonomic
Repetitive motion, awkward postures, manual handling.
Psychosocial
Fatigue, workload, harassment, understaffing.
What you find
Hazard category
0 of 5 matched
The skill this course develops is recognizing credible sources of harm, checking the controls and escalating uncertainty before work continues.
The walk-the-floor method
A structured floor walk provides a repeatable sequence and can reduce reliance on whatever happens to catch the observer's eye. It must still follow site access rules and must not expose the observer to hazards.
Look → Ask → Check → Record
1. Look
Look — scan the area systematically: floor, eye level, overhead, and behind equipment. Most walks only cover eye level.
2. Ask
Ask — talk to the people actually doing the task. They know the shortcuts and workarounds that never make it into the procedure.
3. Check
Check — verify controls are actually in place and functioning, not just documented as present.
4. Record
Record — write it down immediately, in specific terms ("guard missing on band saw #3," not "equipment concerns").
1 / 4
The single biggest failure mode in floor walks isn't missing a hazard — it's noticing one and not recording it before getting distracted by the next task.
Scoring risk: likelihood × severity
Once a hazard is identified, scoring it consistently is what lets you prioritize action instead of treating every finding as equally urgent.
A simple 3×3 risk matrix
Rate likelihood (Low / Medium / High) and severity (Minor / Serious / Major), then combine them:
| Likelihood ↓ / Severity → | Minor | Serious | Major |
|---|---|---|---|
| Low | Low | Low | Medium |
| Medium | Low | Medium | High |
| High | Medium | High | High |
This 3×3 matrix is an educational example, not a universal legal threshold. Organizations must define rating criteria, required actions and escalation rules for their hazards and jurisdiction. Stop work immediately for imminent or serious danger in accordance with applicable law and the site's approved process. Do not use a low matrix score to accept a risk when a mandatory control is absent.
Same hazard, different risk: what changes is exposure
Identifying a hazard and assessing its risk are two separate steps. The hazard is the thing itself, a live electrical panel, a suspended load, a vicious animal in an enclosure. It exists whether or not anyone is nearby. Risk only appears once an activity puts a person in a position to be exposed to that hazard, and the level of risk depends almost entirely on how well that exposure is controlled, not on the hazard changing.
A simple way to hold this: risk grows out of a hazard combined with an activity that creates exposure to it. Change the activity, or change how the exposure is controlled, and the risk score changes even though the hazard itself never does.
Same task, different controls
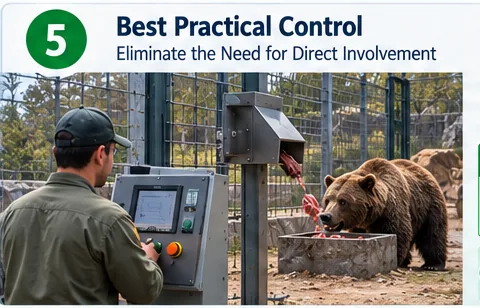
Take a wildlife-facility worker whose job is to feed a bear housed in an enclosure. The hazard, an animal capable of causing serious or fatal injury, is identical at every stage below. Step through it in order and notice what actually changes.
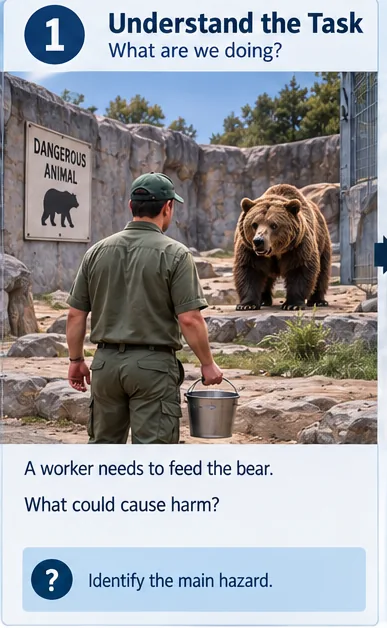
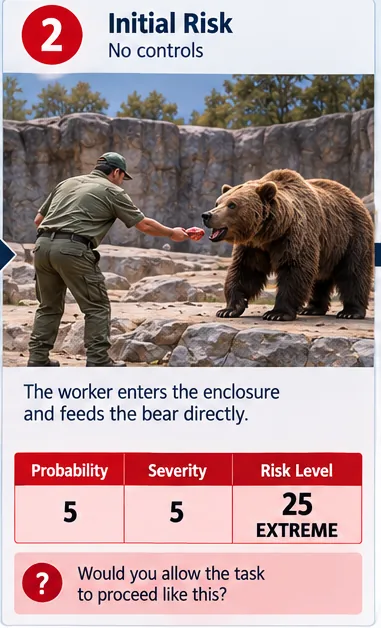
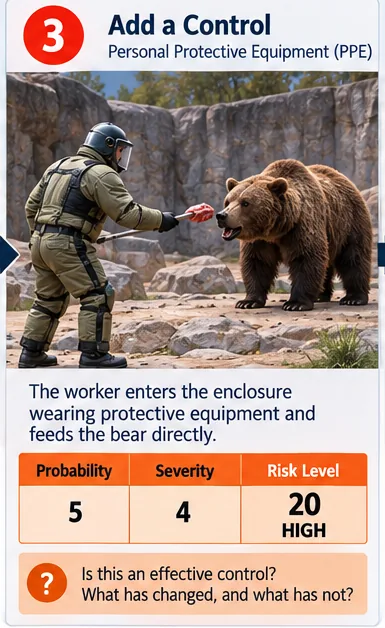
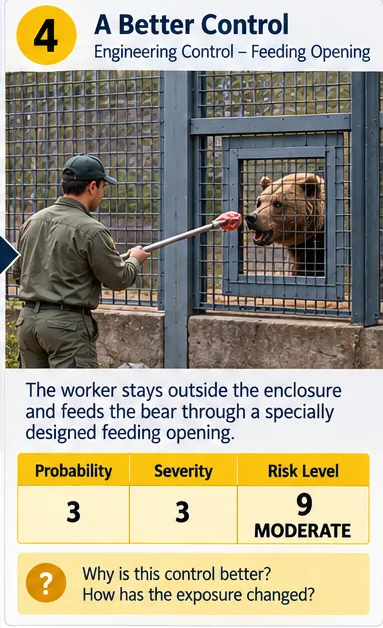
Step 1 of 6
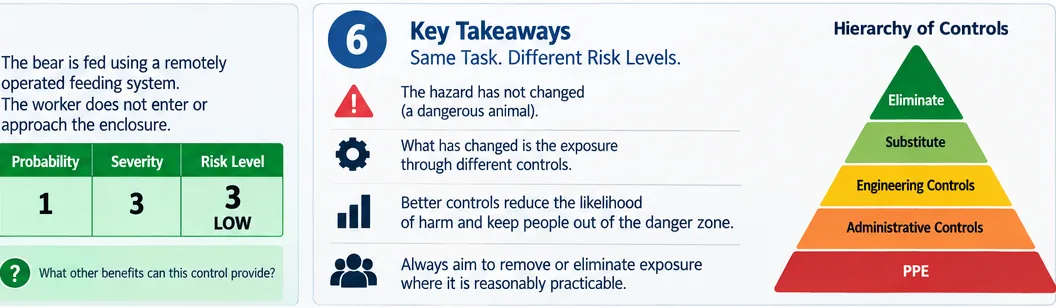
Notice that PPE brings the score down only a little: probability stays at 5, and only severity drops, because gloves and a helmet reduce how badly an incident would hurt without reducing how often the worker is standing next to the bear. The engineering control is different: moving the worker outside the enclosure changes the task itself, so both probability and severity drop. The remote feeding system pushes probability down further still, to the point where the worker never has direct contact at all, but notice the diagram still scores it low, not zero. Severity holds at 3, because the hazard, an animal capable of serious harm, hasn't gone anywhere. That's worth sitting with: even the best practical control manages exposure, it doesn't make the hazard disappear.
Key lesson
The hierarchy of controls shown in the diagram is the same order worth applying to any hazard: eliminate or substitute first, then engineering controls, then administrative controls, and PPE last, as the layer that protects the individual once everything upstream of it has already been tried.
Writing corrective actions that stick
A corrective action that doesn't specify who, by when, and how it will be verified is a wish, not a plan. Make every corrective action SMART:
Measurable — define what "fixed" looks like so there's no ambiguity at sign-off.
Assigned — one named owner, not "the maintenance team."
Realistic — a deadline the owner can actually hit given other workload.
Time-bound + verified — a due date, and a different person confirming it was actually done.
Before: "Improve guarding on saw."
After: "Install fixed guard on band saw #3 (Bay 2) — owner: J. Alvarez, due Aug 10, verified by shift supervisor before saw returns to service."
Try itYour floor walk found a missing guard on band saw #3 in Bay 2. Which corrective action would you sign off as a real plan?
This is a wish, not a plan. No specific saw, no owner, no date, and no way to know when it's "improved".
Better, but "the maintenance team" isn't one named owner, "as soon as possible" isn't a date, and nobody is checking it was done.
Right. It's specific, defines what fixed looks like, has one owner and a realistic date, and someone else verifies it before the risk returns.
Verification should be proportionate to the risk and follow the organization's approval rules. Higher-consequence controls normally need stronger technical and independent assurance than routine administrative corrections.
Final assessment & certificate
Ten questions covering the full course. A verified learner must complete all lessons and achieve at least 70%. The server records the attempt and issues the certificate, not the browser.
Question 1 of 10